|
To watch a short installation video, see this link.
Just scroll to the 8 minute point to go directly to the
installation.
Note: The video is a bit dated, but the information is
still accurate.
Note 2: Some of the pre-install set up is done for you
already now. (water lines, pressure regulator now come pre-assembled.)
|
Congratulations!
You have chosen
the very latest innovation in point-of-use water
filtration and purification. Your WHOLLY WATER ®
Appliance was engineered to be the most
effective, durable and convenient drinking water
treatment device available. It will provide
years of sparkling, clean drinking and cooking
water "ON DEMAND" for about a penny a gallon.
This product is for use
on potable
well water that has been treated to municipal
standards. For cold water use only.
NOT
TO BE USED ON UNPOTABLE or MICROBIOLOGICALLY
UNSAFE WATER.
Water flow through
Unit must be under 100º F. Performance and life
may vary depending on water quality.
Replace anytime after 6 years. This product has
no effect on water hardness.
Important!
Water pressure over 60 psi
will void
warranty and may
adversely affect performance of Appliance. Your device now
comes with a pressure regulator pre-installed.
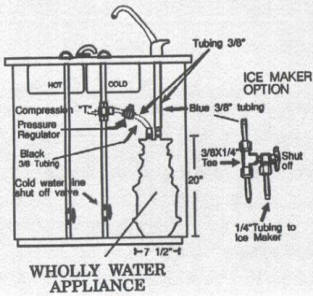
Step 1:
Install the
long-reach drinking water faucet. Please
follow these instructions for drilling
porcelain-covered iron sinks. Never attempt to
drill a vitreous china sink.
AVAILABLE HOLE
If your sink has
a standard 1-1/2” diameter hole available, you
may use it for easy installation. Be sure
to use a large, chrome-plated washer above the
sink with a corresponding washer underneath.
Sink
drilling instructions:
Carefully choose
desired position on a flat area of the sink. Be
sure point is at least 4 inches
from the corner.
Place tip of carbide drill directly onto point
selected. Then, before drill rotation, firmly
press downward until a slight grinding sound is
audible. This sound will indicate that you have
fractured the porcelain, which will prevent the
drill from walking. Begin drilling while
applying firm, downward pressure. Be very
careful when drill is breaking through. Drill
may have a tendency to grab.
Note:
If firm pressure is
not applied during the initial drilling
operation, progress will be retarded and
difficult. Inadequate pressure will also cause
unnecessary wear on the drill. Strong pressure
is suggested.
STAINLESS STEEL
SINK
Using a
high-speed drill bit, drill a 7/16” or 1/2”
diameter hole in selected area of sink rim.
Make small indentation with punch to prevent
drill from walking.
FORMICA TOP
Using a
carpenters’ drill or high-speed drill bit, drill
a 7/16” or 1/2” diameter hole.
FAUCET MOUNTING
First, remove all
hardware from the faucet base except the rubber
washer. Put threaded portion of the faucet
through newly drilled or existing hole with the
handle in desired position. Now anchor the
faucet in position with flat washer, lock
washer, and nut. Use a wrench on the flat sides
of the faucet to maintain original position.
Make certain to protect faucet finish by using a
cloth between the wrench jaws and the faucet.
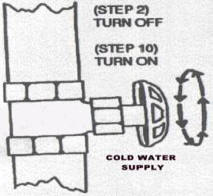
Step 2:
Position the
appliance on level floor under the sink in a
convenient location. Turn off cold water supply.
Note:
Go to Step 3 or 4
depending on parts supplied. Some Units have
these pre-assembled.
If so, you can skip step 5 thru 7. Make sure
connections are tight as directed.
Step 3:
Place the saddle
valve on the cold water line. Make sure the
rubber seal is in place. Tighten the 2 small
bolts. Turn the T handle in to pierce a hole in
the copper or plastic pipe. Turn it back to open
the flow.
Step 4:
Mark the copper
cold water line in 2 places, 5/8” apart, approx.
4 to 6 inches above the shut-off. Cut the line
on both marks and remove the 5/8” piece. This
must be accurate since the tee fits in this
space. Attach the tee to the line closest
to the shut-of first. This will make the
completion of the tee installation easier.
Step 5:
Attach 1 backwash
insert to end of black tube coming from
regulator (inlet tube).
Note: Do not cross thread or over tighten.
Step 6:
Attach the other
backwash insert to either end of the blue 3/8”
plastic tube (outlet tube).
Note: Do not cross thread or over tighten.
Step 7:
Attach black inlet
tube to 3/8” compression tee. Make sure plastic
compression sleeve (Ferrule) is on tube first,
and then plastic insert is inside tube.
Step 8:
Attach blue
outlet tube to faucet.
Step 9:
Note: Keep backwash plugs straight. Improper
alignment can cause leaking or plug breakage.
Step 10:
Turn on cold
water supply and check for leaks.
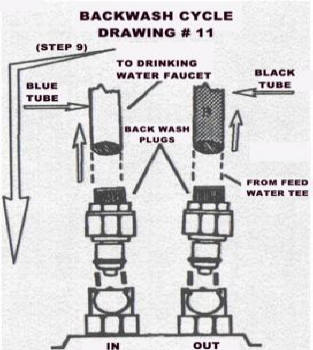
BREAK-IN INSTRUCTIONS
(See drawing
#11)
First, the
appliance must be run in the backwash cycle for
10 minutes.
(1) Turn WHOLLY
WATER ® faucet ON.
(2)
Plug insert on
blue tubing from drinking water faucet into the
“IN” coupling on top of appliance.
(3)
Plug insert on
black tubing from compression tee into the “OUT”
coupling on top of appliance.
(4)
Allow water to
run for a full 10 minutes.
Note:
At first, your
water will sputter and run dark momentarily.
This is a normal, temporary condition common to
ALL filtration devices containing granulated carbon. After
backwashing for 10 minutes, return the “IN” and
“OUT” inserts to their normal filtering
positions. (Feed water line (black) to “IN”
coupling and faucet line (blue) to “OUT”
coupling.) Turn faucet ON again and allow water
to run for an additional 5 minutes to reset the
media beds and flush the lines.
Your appliance is
now ready for service. You WHOLLY WATER ® unit
is a heavy-duty APPLIANCE; not a typical carbon
filter. It contains nearly 12 pounds of
filter media. Accordingly, there will be
considerable amount of air bubbles generated as
air in the dry, multi-media beds is replaced by
water. This harmless, bubbly effervescence,
which appears to “gray” your water temporarily,
will rapidly cease with use. But can take
several days or longer.
**Periodically, check for leaks at all
connections!**
BACKWASH INSTRUCTIONS
Backwash every 3
months for 10 minutes or anytime flow rate slows
noticeably. To backwash, simply reverse the “IN”
and “OUT” inserts and turn faucet on for 10
minutes. To filter again, return the “IN” and
“OUT” inserts to their normal positions and turn
faucet on for 5 minutes to re-set the media beds
and to flush the lines.
ICE
MAKER OPTION
In most instances,
you can easily connect your appliance using an
ice maker humidifier kit or equivalent parts.
Simply install a 3/8” x 1/4” tee with a shut-off
in the blue tubing, which goes to the drinking
water faucet. Run 1/4” tubing to ice maker on
refrigerator.
IMPORTANT!
Water supply to ice maker MUST be “OFF” during
ALL backwash cycles, INCLUDING BREAK-IN.
Make sure plugs
are not in a bind.
To prevent breakage, keep plug inserts
straight up and down
when pushing them down into
black top of Wholly Water Appliance. |
|
|
|
Pressure Regulator
Included with
every unit. Please do not remove or adjust
Pressure Regulator. This will void Warranty.
 |
ATTENTION INSTALLER:
Pressure
regulator is preset at factory to 40 psi
outlet pressure. This will ensure one (1)
gallon per minute water flow. Do not remove
or adjust pressure regulator.
Make sure pressure regulator is connected
correctly to the "IN" and "OUT". Pressure
regulator is attached to the black line of
the Wholly Water Unit.
CAUTION:
Do not allow Teflon tape to block
openings on regulator. Start tape on
second thread.
Screw in fittings about 1/2 of the way into
regulator.
Leave 1/2 of thread showing. Over
tightening fittings will restrict and/or
stop water flow. |
|
The "Ultimate" Drinking
Water Filter Kit - Just $499!

 The Wholly Water
Purification System Includes the Following: The Wholly Water
Purification System Includes the Following:
- 5 Stage Patented Ultimate
Water Filter
- Dedicated
Long-reach Faucet
- Pressure Regulator - 3/8
inch
- Water Alarm with Remote
Sensor
- Video Instructions/Instructions
- 2 year unconditional warranty:
If the WHOLLY WATER® Drinking Water Purifier fails to perform, it will
be repaired or replaced FREE!
To Order, contact us by Phone or Click Below to buy
online.

|
Items include
with the Wholly Water Undersink Filter
|
 Long-reach
faucet
with black plastic push-down handle. Color: Silver metallic. Long-reach
faucet
with black plastic push-down handle. Color: Silver metallic.
|
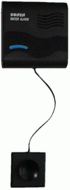 Water Alarm with Remote
Sensor Water Alarm with Remote
Sensor
-
- Warns
of leaks and overflows in bath, kitchen, laundry, furnace, computer
rooms or anywhere there is a potential for leaks. It's cheap
insurance if you have any kind of filter.
|
Pressure Regulator
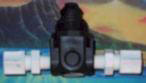
We send connection for a
3/8" pipe size, but also have a 1/4" connection available.
|
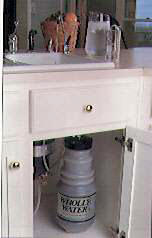
Considerations
before buying:
1) The filter measures 19" height, 8" diameter.
Make sure it will fit. Otherwise you may need to locate it
elsewhere, depending on your home's layout. In this event, you
can get the extra fittings to place the filter in your garage or basement, or even
the cabinet next to your sink. We may need to discuss your needs to get
you the right equipment.
 2) The drinking water
filter uses it's own dedicated faucet. Normally
a pre-existing hole is used. If no hole exists, a whole can be
drilled. You may need a special drill bit for ceramic sinks/countertops. Ask
your plumber. Or, a hole can also be drilled into the countertop,
right next to the sink, as in picture. 2) The drinking water
filter uses it's own dedicated faucet. Normally
a pre-existing hole is used. If no hole exists, a whole can be
drilled. You may need a special drill bit for ceramic sinks/countertops. Ask
your plumber. Or, a hole can also be drilled into the countertop,
right next to the sink, as in picture.
(In this picture,
I personally would have used the soap dispensor whole!)
Click
here to see easy install instructions.
|
.png)

Act
|